01 09 10

search you little tarte

Thursday, January 30, 2014

A Fine Line Between Love and Hate

Super Bowl Ready
I have sort of a love/hate relationship with Martha Stewart.  I say that as though she and I actually have a relationship.  Clearly, Martha and I don't know one another, but I feel like we have a relationship because well, Martha is omnipresent.  She's everywhere.  Even while Martha was in jail, she was still everywhere.  And, like clockwork,  Martha Stewart Living continued arriving in my mailbox, further insuring that Martha was still lurking, even if just from her digs at the federal pen.

My point is that I'm not really sure how I feel about Martha Stewart.  So, me being me, I made a list to evaluate.  (Please note that this list took about 20 seconds to compile.)

A Few Good Things About Martha:

She's a strong, successful woman, (albeit a convicted felon which is decidedly not a good thing).
She has lots of good ideas to enrich what I suspect she thinks are our somewhat mundane lives.
She's very organized.
She can decorate a whole jail cell for any holiday using just a hot glue gun and origami paper.

and A Few Things I Don't Really Like About Martha:

She calls aromatics like rosemary and thyme "herbs", as in "This is my friend Herb Greenberg".  Everyone knows that "Herbs" are people, and "erbs" are food.

She has a lot of great ideas but they always seems to require a trip to the lumber yard, a jigsaw, tubes of hot glue, and a welders mask.

She gets very angry at Matt Lauer and Savannah Guthrie on the Today Show when they don't follow her directions to the letter.  I mean, come on.  It's a three minute segment, and Martha may be able to whip up platters of Super Bowl Snacks in the allotted time, but she also has a team of low paid semi-professionals on standby who make it look effortless.

While Martha's ideas are certainly impressive, her recipes sometimes fall short.

Such is the case with this recipe for Chocolately Pretzel and Peanut Cookie Bars.  Really good idea, but the execution.... not so much.

Martha's original recipe calls for a crust made of ground up pretzels, butter and sugar.  The resulting cookie bar was sticky and didn't hold together well.  After sampling the results to the tune of half the pan, I tried again.  This time I substituted in a nice, thick graham cracker crust which provided a solid base for all the pretzely goodness that was to follow.  I also scattered on a little additional graham cracker crumb to "tie the whole thing together".  The resulting bar was not only delicious but easy to cut and eat.  (And pack.  I sent them off to Kate at college where I am sure they were met with a great amount of enthusiasm.  These are college students, after all.  Stale sandwich cookies from Costco would be met with great enthusiasm.)

Maybe Martha was just better at making these bars using her recipe than I was.  Who knows?  All I do know is that the idea was good, Martha's execution so-so, and my adaptation, positively yummy.


Chocolatey Pretzel and Peanut Cookie Bars
(Adapted from Martha Stewart Living, January/February, 2014)

Ingredients::

12 tablespoons unsalted butter, melted, plus more for pan
31/4 cups graham cracker crumbs, divided
2/3 cup granulated sugar
2 cups salted mini pretzel twists
1 can (14 ounces) sweetened condensed milk
1 1/3 cups lightly salted cocktail peanuts
6 ounces bittersweet chocolate, preferably 61 percent cacao, coarsely chopped (about 1 cup)

Directions:

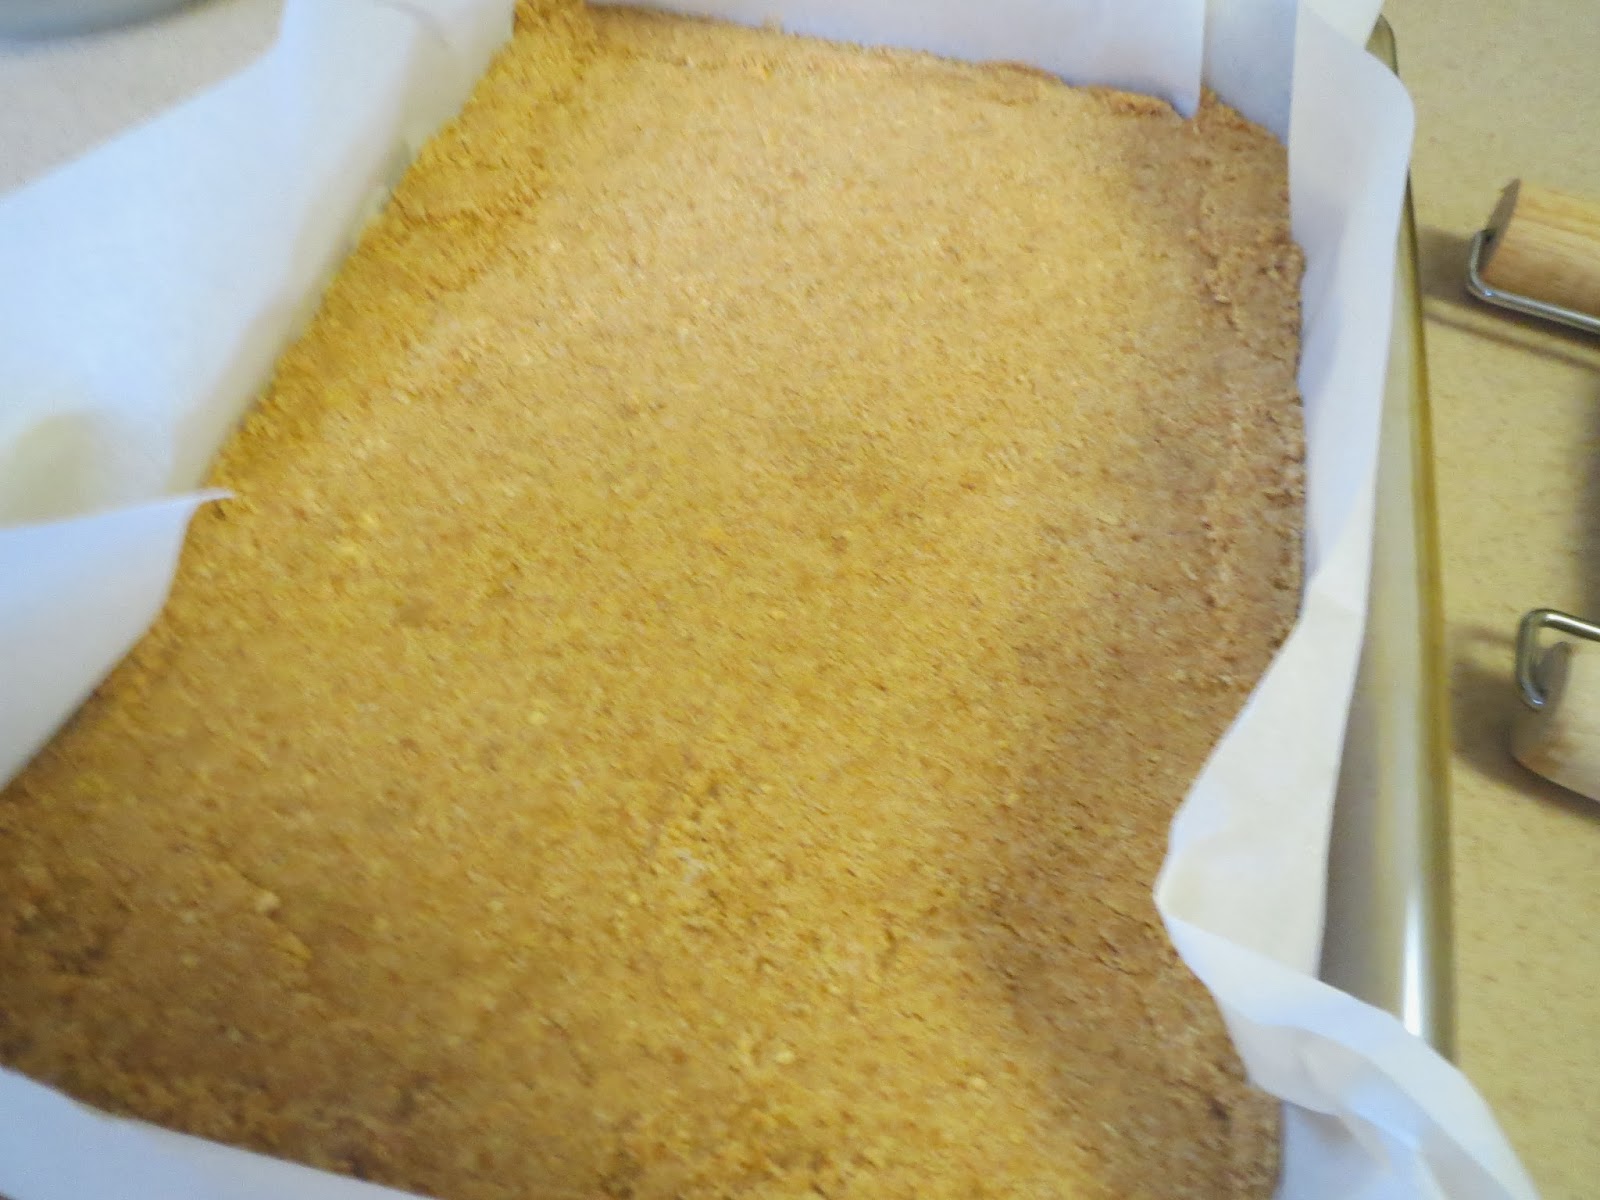
Preheat oven to 350 degrees. Butter a 9-by-13-inch baking pan and line with parchment, leaving a 1-inch overhang on long sides. Butter parchment.

Place 3 cups graham cracker crumbs in a large bowl and stir in sugar and butter until well combined. Transfer to pan, spreading evenly, and pack down flat with the bottom of a measuring cup or small roller.. Drizzle condensed milk evenly over crust. Sprinkle evenly with peanuts, chocolate, remaining graham cracker crumbs, and pretzels, gently pressing them into milk.

Bake until chocolate melts and condensed milk bubbles and becomes golden, 20 to 22 minutes. Cool completely in pan on a wire rack, then refrigerate until chocolate is set, about 30 minutes. Run a paring knife between bars and short sides of pan. Using parchment overhangs, transfer to a cutting board. Cut into 20 squares.

Wednesday, January 29, 2014

Someone Has To Go First


You really have to admire the first person who tried eating an artichoke.  Artichokes are not a friendly looking food.  In fact, I'm not sure artichokes really even look like food.  But maybe to the caveman, or whoever first thought "maybe we can eat this", it was worth the risk.

Artichokes just don't look edible.  The idea of dealing with those prickly leaves, and all that furry looking stuff around the heart well, it just doesn't scream "Eat Me!" to me.

But alas, someone did  originally try artichokes.  Whoever that was discovered they were quite tasty, or at least he discovered that you could actually eat one without dying.  Kudos go out to that guy, but moreover, to the person who decided that dipping the leaves in melted butter would be a nice way to enjoy them.  (Clearly a woman was responsible for that for sure.)

I also want to give a shout out to the person who first froze artichoke hearts.  This is a cook (or maybe a scientist) after my own heart.  Frozen artichoke hearts (which, btw, are actually called for in this recipe) make this, and many other recipes, a complete snap.  In this recipe, you could substitute in canned artichoke hearts which would also work well.  I suppose you could also go the purist route, and makes this recipe with fresh hearts, but why?

In any case, you should make this recipe.  It's relatively quick and really nice for a weeknight dinner.  And as you're enjoying your chicken, pour yourself a nice glass of wine, and toast the person who first thought "this could be good".


Recipe:  Roast Chicken with Mushrooms and Artichoke Hearts
(Food 52.com)

Ingredients:

4 chicken breast halves, skin on, boned if you like
3 tablespoons olive oil
2 large shallots, chopped fine
8 ounces mushrooms, sliced (about 2 cups)
2 tablespoons all purpose flour
2 cups chicken stock or broth (Use your best chicken stock -- you won't be sorry.)
1 1/2 cup frozen artichoke hearts (about 10), quartered, defrosted, and drained
1 tablespoon Worcestershire sauce
1 tablespoon fresh lemon juice
1 teaspoon chopped fresh rosemary
Salt and freshly ground black pepper to taste
1 tablespoon butter (optional)

Directions:

Season chicken with salt and pepper on both sides. (If you can, do this early in the day and refrigerate them, covered loosely. This will help the skin crisp up. But it's totally optional.) When you get home, take the breasts out of the refrigerator.

Heat oven to 375.

Heat olive oil in a large skillet over medium heat. Add the chicken breasts skin side down. Cook 2-3 minutes until skin is golden brown. If you have boneless chicken breasts, brown all sides. Remove chicken breasts to oven-proof dish, and place in oven. Roast breasts for 15 (for boneless) to 30 minutes, or until the internal temperature reaches 165 degrees.

While chicken is roasting, sauté chopped shallots and mushrooms with a pinch of salt in oil and pan drippings (you may need to add a little more oil) until shallots are soft and mushrooms have begun to brown slightly and give off their liquid. Stir in flour and cook over medium-low heat until nutty and brown, stirring frequently, about 3-5 minutes. Pour in chicken stock, and raise heat, until sauce begins to simmer and starts to reduce somewhat. Reduce heat to low and stir in artichoke hearts, Worcestershire sauce, lemon juice and rosemary. Stir together and cook over low heat until sauce thickens and is blended together and fragrant. Taste and add salt and black pepper as desired. You can turn the heat off and cover it till the chicken has finished roasting.


Just before serving, swirl in a tablespoon of butter if desired. When the chicken has reached an internal temperature of 165, remove it from the oven and let it rest for a few minutes. Serve each piece on a bed of sauce, making sure that each serving contains artichoke hearts and mushrooms.

Monday, January 27, 2014

Pittsburgh Food


I must admit that, before I lived in Pittsburgh, I had never eaten a pierogi.  In fact, I had never actually given pierogis a moment's thought.  But then I moved to the 'burgh where pierogis are so popular that they're the Pittsburgh Pirates' mascots.

Let me introduce you to Cheese Chester, Jalapeño Hanna, Saurkraut Saul, and Oliver Onion.

Needless to say, the Pirates' Pierogis are much loved in these parts.  For a while, Kate was collecting Pierogi bauble heads.  Thankfully, she finally got all four and they are now happily residing amongst all the other crap in her bedroom that she just had to have but will probably never look at again.

But I digress.  Pierogis (the ones you can actually eat) are very popular here in Pittsburgh.  In fact, you can purchase them from old ladies who make them in church basements.  You can buy them fresh.  You can buy them frozen.  You can order them in restaurants, and at PNC Park.  Pierogis are like the national food of Pittsburgh.

Having never really given much thought to pierogis, I obviously had never made them.  But then something happened.  Food 52.com featured a recipe for said pierogis and I felt that it was my civic duty to give them a try.

I am going to start by saying that making pierogis was perhaps the most labor intensive thing I have ever done, and that pretty much includes going through actual labor.  You have to make the dough.  Then the dough is refrigerated.  You have to make the filling.  Then the dough has to be rolled, cut, and filled (times 50).  Then the final product is either sautéed or boiled.  Then, and only then, are they ready to eat.

Here's the thing.  These pierogis were actually quite tasty.  Were they as good as the frozen ones?  I like to think they were better.  Were they as good as the ones made by the old women in church basements?  Probably not.  They're the professionals.  I'm just a neophyte, but maybe if I make pierogis 500 more times, mine will be just as good.  Until then, I have about 40 in the freezer waiting to be sautéed or boiled.


Recipe:  Potato, Mushroom, & Caramelized Onion Pierogi
(Food 52.com)

Ingredients:


For the Pierogi Dough
2 cups full fat plain or Greek yogurt
1 egg, lightly beaten
teaspoon salt
2 1/4 cups flour + more for kneading
Directions:
Beat the yogurt, the egg and the salt together with an electric beater on low until smooth and creamy. Slowly add the flour, beating until smooth. The dough will be very sticky. 
Scrape the dough out of the bowl onto a well-floured work surface and knead in enough flour until the dough is smooth and workable (can be rolled out and cut). It will be tacky but not so sticky that it runs all over the work surface and sticks to your hands in a major way. 
Wrap the dough in plastic wrap and put it in the refrigerator for 2 hours to firm up.  
 For the Potato, Mushroom & Caramelized Onion Pierogi Filling:
yellow onions, chopped
pound white mushrooms, trimmed and finely diced
3/4 pounds potatoes for mashing
4 - 6 tablespoons unsalted butter
Salt and freshly ground black pepper
Sour cream or Full-fat or Greek yogurt for serving
Directions:
Chop the onions. Melt 2 tablespoons butter in a large skillet and sauté the onions until caramelized a deep brown, caramelized but not burned. Remove from the skillet and set aside. 
In the same skillet, melt another 2 tablespoons of butter and add the chopped mushrooms. Salt and pepper the mushrooms and sauté until they are tender and all the liquid exuded by the mushrooms has evaporated, 5 minutes. Remove from the heat. 
While you are cooking the onions and mushrooms, peel and quarter the potato(es) and place in a small pot. Cover with cold water, bring to a boil, then lower heat and simmer until soft and mashable, 15 to 20 minutes. Drain and place in a large mixing bowl. 
If you want the filling a bit richer, melt the extra 2 tablespoons of butter and add to the potatoes. Mash and whip the potatoes until smooth and fluffy. Fold in the cooked mushrooms and the caramelized onions until well blended. Salt and pepper again to taste. 
Take the dough out of the fridge and work with half at a time. The other half keep in the fridge. 
Keeping both your work surface and the surface of the dough well floured, gently roll out the dough to a thickness of about 1/8 inch (1/2 cm), gently lifting it up to flour underneath and turn. Keeping your hands floured also helps. 
Using a 3-inch (7 ½ cm) round cookie cutter (they can be made larger if you like) carefully cut out circles, trying not to deform the circles of dough too much, although this dough is easy to work with and “correctable”. I lifted up the circles, 2 or 3 at a time, and made sure they were on a floured section of the table before trying to fill and fold. With floured fingertips, I tapped each circle a bit to stretch out the circle. Place a mounded teaspoon of filling just off of the center of each round of dough. 
Now, gently pull the wider half over the mound of filling and place the side edge-to-edge with the side with the dough. With the edges matching/meeting, just press with the side of your floured index finger, pulling the dough and pressing to seal. The edge should be a bit less than a finger’s-width. This will also keep the edge from being too thick. Be very careful not to rip the dough covering the filling. 
As you form the pieorgi, 1, 2 or at the most 3 at a time, place them on a floured or lined and floured plate or baking sheet until you are ready to cook. 
Bring a pot of water to a boil. Once it is boiling, lower a bit to a healthy simmer and drop in the pieorgi just 6 or 7 at a time (they shouldn’t crowd or overlap in the pan). Allow to cook for 6 to 7 minutes. They should float to the top and, when lifted out with a slotted spoon, should look puffy. Cook the rest in batches. Place on towels to drain. 
To fry, simply heat olive oil or a mixture of butter and olive oil in a skillet and fry the pierogi for a few minutes per side, in batches, again, not overcrowding. They should be golden on each side. 
Serve hot with extra yogurt for dipping.

Sunday, January 26, 2014

Thanks For The Good Tip


It's always helpful to have friends who share your food tastes.  Let's face it, not everyone is going to get excited about a recipe for a Greek Lamb Stew, and I accept that.  Fortunately for me, my good friend Heidi saw this recipe on Food52.com, mentioned it to me, then made it, and passed on her notes to me.

Just as an aside, two things about Heidi.  Heidi reads the comments and reviews people leave for everything.  She's actually one of those really well informed consumers, something to which I only aspire.  When Heidi goes out to purchase a major appliance, she actually goes armed with data.  She knows what she's looking for.  Unlike me.  I know what I need, and even what I want, but too often I get swept up in all the other stuff.  Whereas, Heidi may want certain features on her dryer, I get distracted by the color which, let's face it, should be a major determinate in absolutely nothing.

Heidi is also the best internet searcher I know.  Honestly, the woman can find absolutely anything you could ever want for less than you ever thought possible.  Truly, it's a gift.  She taught me the ins and outs of Priceline.  While I haven't gotten Ted onboard with the whole idea of picking a hotel without knowing exactly what you're picking, I'm game and I'm ready to go should we need an unnamed hotel in New York City in the near future.  Heidi taught me well.

In any case, Heidi made this "Greek" Lamb with Orzo dish before I did.  She also read all the comments  from others who had already made it, and incorporated those changes.  She passed it all on to me, and I made it.

Once again, Heidi did the legwork and I reaped the benefits.  Thank you Heidi!

Recipe:  "Greek" Lamb with Orzo
(Originally posted on Food52.com)

Ingredients:

1 pound ground lamb
1 tablespoon olive oil
1 large yellow onion, finely chopped
6 cloves garlic, sliced thinly
4 teaspoons ground cinnamon
2 teaspoons dried oregano
3 teaspoons ground cumin
4 teaspoons ground coriander
1 teaspoon crushed red pepper
28 ounces can of whole tomatoes, drained and smooshed with your hands (fun!)
5 ounces fresh spinach, chopped
1 pound orzo pasta
2 cups chopped fresh parsley
1/4 cup lemon juice, freshly squeezed
2 tablespoons olive oil
salt and pepper, to taste
1/4 cup kalamata olives, pitted and finely chopped
1/2 cup crumbled feta

Directions:

In a good sized Dutch oven or other heavy bottomed pan, heat the one tablespoon of olive oil over medium-high heat until it is shimmering. Add the lamb and sprinkle with 1/2 teaspoon of salt and a good grinding of black pepper. Cook, stirring to break it apart, until it is nicely browned. Remove the lamb with a slotted spoon and drain all but 2 tablespoons of the fat.

Return the pot to the stove top and add the onion and garlic (still over medium-high). Cook, stirring occasionally, until they are softened and golden, about 5 minutes. Stir in the spices (cinnamon, oregano, cumin, coriander, and red pepper) and cook until they start smelling extremely toasty and fragrant (1-2 minutes). Then, stir in the smooshed tomatoes. Cook the smooshed tomatoes in the spices, stirring occasionally, for 10 minutes. Bring to a boil, then turn the heat down and simmer, uncovered, for 15 minutes.

Add the cooked lamb back to the pot, give a good stir, then cover the pot and leave it to cook, stirring from time to time, for 20 minutes. At this point, stir in the fresh spinach and cook just a couple more minutes until the spinach is wilted. Taste and add salt and pepper to taste (keeping in mind you'll be sprinkling just a touch of feta and olives on, which will add to the saltiness).

While the lamb and tomatoes are simmering together and marrying their flavors, bring a large pot of well-salted water (it should taste like sea water, basically) to a boil. Add the orzo and cook until al dente, about 7 or 8 minutes, usually. Reserve 1/2 cup of pasta water. Drain the orzo. Toss the orzo with the 2 tablespoons of olive oil, the lemon juice, and all of the parsley, adding a bit of pasta water at a time, if you feel it needs additional liquid. Spread the orzo out on an enormous serving platter. Spoon the lamb and sauce all over the top, then sprinkle with the feta and chopped olives. Pass the dish around the table and relax.


Tuesday, January 21, 2014

Pear Shaped


 Hands down, my favorite meal is breakfast.  Back when I was a kid, I didn't love breakfast as much as I do now, but that's probably because my mother insisted on serving us eggs "country style".  Country style is just a fancy way of saying runny, and I didn't (and still don't) like runny eggs.

But I digress.  Now that I've learned that eggs don't have to be jiggling on the plate, I actually really like them.  I also love all the things that go with eggs: bacon, toast, potatoes, and yes... muffins.  I love a good muffin.  For me, a good muffin has nice texture, a little crunch, and isn't too sweet. Muffins are after all,  a breakfast food.

But just how many banana nut and blueberry muffins can a girl make, before she finds herself longing for something just a little different? A long time apparently.  I've been making banana muffins for what seems like forever.  Don't get me wrong.  I love a good banana nut muffin, but I do often long for something a little different.

Thanks to Smitten Kitchen, my wish was grated in the form of these absolutely delicious pear hazelnut muffins.  Pears?  You thought pears were only for baby food, but you would be wrong.  Their soft, sweet taste permeates these tender muffins.  The hazelnuts give an appealing crunch, and the chocolate well, that just adds a little something-something extra.


Don't let the fact that you'll have to grate the pears on a box grater keep you from whipping up these muffins.  The grated pear adds some nice texture as well, so don't cheat and do it in the food processor.  It's only a cup, so it's not like it's even worth dirtying the processor bowl anyway.

These muffins are a whole new way of looking at pears.

Recipe:  Pear and Hazelnut Muffins
Adapted from Whole Grain Mornings and Smitten Kitchen

Yield: 16 muffins (I sent a dozen to the office with Ted because I would have eaten all of them had they had remained in the house.)

Ingredients:

2 small-medium firm pears
6 tablespoons (85 grams) unsalted butter, melted and cooled slightly (plus more for cups if you're not using liners)
2/3 cup (125 grams) natural cane sugar, such as Turbinado, light brown or granulated sugar (I used Turbinado)
1 cup (240 ml) buttermilk
2 large eggs, lightly beaten
1 to 1 1/2 teaspoons vanilla extract
3/4 cup (75 grams) rolled oats
1 cup (125 grams) all-purpose flour
1/2 cup (60 grams) whole wheat flour
3/4 teaspoon baking soda
2 teaspoons baking powder
1/4 teaspoon ground cinnamon
1/2 teaspoon ground nutmeg
3/4 teaspoon kosher salt
1 cup (120 grams) toasted hazelnuts, coarsely chopped
1/2 cup (85 grams) bittersweet chocolate chunks (optional, but not optional for me.)

Directions:

Heat oven to 425°F. Butter a standard 12-cup muffin tin or line it with papers.

Peel the pears, then halve and core them. Grate pears on the large holes of a boxed grater into a large bowl. You should have about 1 cup grated pear. Stir in melted butter, sugar, buttermilk, eggs and vanilla until combined.

In a separate bowl, stir together the oats, flours, baking soda, baking powder, spices, salt, all but 1/2 cup coarsely chopped hazelnuts, and chocolate chunks, if you’re feeling extra indulgent. Gently fold this dry ingredient mixture into the wet batter until just combined; do not overmix.

Fill muffin cups almost up to the top and sprinkle with the reserved 1/2 cup hazelnuts. Place muffins in oven and immediately reduce the heat to 375°F. Bake for 20 to 25 minutes, or until the tops are golden brown and a toothpick inserted into the center of muffins comes out batter-free.

Cool muffins in pans for 10 minutes, then transfer to a cooling rack. Muffins will keep for 2 days at room temperature in an airtight container.


Sunday, January 19, 2014

Not Just For Business News


We get home delivery of The Wall Street Journal every Saturday.  During the week, Ted reads it at the office so I don't usually see it.  Once in a while he'll being it home, but for the most part, I'm a Saturday only Journal reader.  (Yes, you're right.  I could read it online, but I'd rather complain that Ted doesn't bring it home for me.  You know how I am.)

And besides, it's fine with me because Saturday's edition  is the best anyway.  Saturday's edition has the Off Duty section.  There's something of interest on every page.  There's even a recipe or two, which I absolutely love.  I mean, come on.  Recipes in the WSJ.  A stroke of genius, if you ask me.


This week's recipe, from food writer Peter Berley, is for a winter root vegetable soup.  The nice thing is that it's a perfect way to use up whatever's lurking in your kitchen: sweet potatoes, parsnips, carrots, celery -- you get the idea.  Mix and match two pounds worth of oddball root veggies and you're halfway done.

I added half the creme fraiche called for in the recipe and, believe me, it was plenty rich.  I also cheated on the walnuts.  I had a package of candied walnuts from Trader Joe's.  They worked like a charm, although I may just have to give these a spin as well.

Either way, The Wall Street Journal serves up not only the business news,  but dinner as well.

Recipe:  Winter Root Vegetable Potage With 
Crème Fraiche and Honey Crisped Walnuts

Ingredients:

For the honey-crisped walnuts:
1 teaspoon unsalted butter
1 cup walnut halves and pieces
3 tablespoons honey
Fine sea salt

For the soup:

1 tablespoon extra-virgin olive oil
1 tablespoon unsalted butter
1 pound onions, roughly chopped
4 cloves garlic
2 tablespoons finely chopped ginger
1 teaspoon sea salt or kosher salt
2 pounds assorted root vegetables, peeled and roughly chopped  (I used carrots, sweet potatoes, celery, parsnips, and rutabagas.)
2 teaspoons fennel seeds, lightly toasted and finely ground
1/4 teaspoon ground turmeric
1/4 teaspoon cayenne pepper
6 cups chicken or vegetable stock
1 cup crème fraîche, plus more for garnish
Freshly ground black pepper
Finely chopped fresh parsley, for garnish

Directions:

Make honey-crisped walnuts: Preheat oven to 350 degrees. Grease a small baking dish or pie plate with butter. Add walnuts to pan and drizzle evenly with honey. Roast walnuts, stirring every 5 minutes, until golden brown, about 14 minutes. Transfer nuts to a plate, season lightly with salt and let cool.

Make soup: Heat oil and butter in a heavy, lidded 4- to 5-quart saucepan or Dutch oven over medium heat. Add onions, garlic, ginger and salt to pan, stir well, cover and simmer over medium-low heat until garlic and onions are soft, 15-20 minutes.

Add root vegetables, fennel, turmeric and cayenne. Increase heat to medium-high and cook, stirring, 2-3 minutes. Pour in stock and bring to a boil.

Reduce heat to low and simmer until vegetables are very tender, 30-40 minutes. Add crème fraîche and simmer 3-4 minutes. Use an immersion blender (or, working in batches, a food processor or stand blender) to purée soup until smooth. Season with salt and black pepper. Garnish with honey-crisped walnuts, parsley and crème fraîche.


Thursday, January 16, 2014

Stirring Things Up


I am not a stir fryer.  In fact, I am not much for Asian food in general.  Ted considers my lack of interest in Japanese, Chinese, and Thai food to be among my greatest failings.  I figure if this is my greatest failing, I'm in pretty good shape.  Besides, that's why I had kids.  Both Charlie and Kate are more than happy to join Ted for sushi or noodles.  Me... well, not so much.

Sure, I can get into an occasional California roll, but aside from that, I'm mostly ambivalent.  Maybe it's my upbringing.  We were just not sushi people.  My mother's idea of exotic cuisine was Italian food.  Asian food was just a little too out there for Patti.

Oh sure, once in a while my family would do Chinese.  This basically meant that we would load the family into the Country Squire station wagon, and go out to the local Chinese restaurant.  My mother, who was always in charge of the menu and making the really big decisions (along with pretty much every else), would order the most basic and benign shopping mall Chinese food on the menu.  There was a fair amount of chow mien and fried rice gracing our table.  We considered ourselves to be really adventurous if we strayed a little and ordered something with a little chili pepper next to it on the menu.  That item was going to be spicy and thus, far more exotic.  Spicy food, according to my mother, was always more exotic than non-spicy food.

But back to today.

I don't often make Asian inspired recipes, but every once in a while, I just go for it.  The thing that's appealing to me about these recipes is that they are often really quick and rely on just a few ingredients.  Such is the case with this recipe from February's Food and Wine.

Lemony Chicken Stir-Fry was delicious.  It was light, which was a definite plus since I'm still acutely feeling the effects of a far too gluttonous December.  And it was easy which, in my estimation, makes any recipe taste better.

While this recipe lacked a little chili pepper next to its title, I think my mother would have labeled it exotic, it being a stir-fry and all.

Recipe:  Lemony Chicken Stir-Fry
(Food and Wine, February, 2014)

Ingredients:

2 tablespoons extra-virgin olive oil
1/2 onion, finely chopped
3 garlic cloves, minced
2 pounds skinless, boneless chicken breasts or trimmed thighs, cut into 3/4-inch pieces
1 tablespoon soy sauce, plus more for seasoning
1/4 teaspoon toasted sesame oil
Kosher salt
Freshly ground pepper
1 tablespoon plus 1 teaspoon finely grated lemon zest
2 tablespoons fresh lemon juice
1 scallion, thinly sliced
Steamed rice, for serving

Directions:

In a large skillet, heat the olive oil. Add the onion and cook over moderate heat, stirring, until softened, 4 minutes. Add the garlic and cook for 1 minute. Add the chicken and cook over moderately high heat, stirring occasionally, until browned all over, 3 minutes. Stir in the soy sauce and sesame oil, season with salt and pepper and stir-fry until the chicken is cooked through, 3 minutes longer. Remove from the heat and stir in the lemon zest and lemon juice. Season with salt, pepper and soy sauce. Transfer the chicken to a platter, top with the sliced scallion and serve with rice.

Monday, January 13, 2014

Breaking Bread


Back in the olden days, when my kids were little and I spent a lot of time hanging out with my friends and their little ones, I learned to bake challah.  I haven't done much challah baking since then, but now that I have plenty of time of my hands, I thought why not? It's not like I have anything else all that pressing to do.

Baking challah again brought back lots of really nice memories.  Back then, before Ted moved me  across the country to Pittsburgh, my friend Deborah and I used to spend a lot of time together with our kids.  We did it under the guise of it being good for the kids to socialize. In fairness, I think it was our socializing with one another that was really beneficial.  Having little kids is hard work, and a little lonely if you don't have your support group up and running.

Anywho, Deborah and I used to tackle lots of projects together.  I think it was our way of feeling like we were actually doing something besides drinking coffee and eating coffee cake. One of the things we tried was baking bread.  We also once tried making our own bagels.  Suffice it to say, it's really worth paying whatever they cost in the bagel shop because making homemade bagels is a ton of work and the bagels really are not as good.

But I digress.  Unlike bagels, homemade challah really is worth the effort.  It's delicious and for the most part, it's a hands off operation (which leaves plenty of time for drinking coffee and eating coffee cake, if you're so inclined).  Yes, there's a little kneading (think of it as exercise), and braiding (think of it as artistic), but mostly making your own challah is a lot of waiting.  Having children who took a zillion lessons, made me an excellent waiter.

I hadn't baked challah in years, but on Friday I got the bug to do it.  There aren't any special ingredients involved -- just yeast, water, eggs, and flour -- so I had no excuse not to get to work.


The challah came out great.  And the resulting french toast over the weekend was delish as well.  But what was really nice were the memories that sweet smell of baking bread brought back.

Recipe:  Ima's Challah
(Food 52)

Makes 2

Note:  Prepare yourself.  This recipe looks far more complicated than it actually is.  Read through it before you start.  Most of the directions deal with the braiding, which really isn't all that complicated at all.

Ingredients:

1 1/2 cup warm water, divided
1/4 cup plus 2 teaspoons sugar, divided
2 tablespoons instant (powdered) yeast
6 cups flour -- either all white or half white whole wheat
2 teaspoons salt
1/4 cup mild honey, plus an extra tablespoon for egg wash, if desired
2/3 cups flavorless vegetable or canola oil
4 eggs, plus one yolk for egg wash, if desired
1 pinch ground cardamom, optional

Directions:

Put 1 cup warm water in a small bowl. Add 2 teaspoons of sugar, sprinkle the yeast over top, swirl the bowl just to combine, and leave it to proof for five minutes.

While yeast is proofing, mix flour, salt, 1/4 cup of sugar and cardamom, if using, in a large bowl (or in the bowl of a stand mixer fitted with the paddle attachment.) Stir to incorporate or blend on low speed.

In a medium bowl, mix remaining water, honey, oil, and eggs. When yeast has finished proofing, add it to the flour, immediately followed by wet ingredients. Mix with a large wooden spoon or on medium-low speed in the mixer, just until combined, about 30 seconds. Switch to dough hook and begin to knead on low speed, making sure to incorporate what's at the bottom of the bowl if the dough hook misses it. If kneading by hand, stir using spoon until dough becomes to thick to stir. Empty dough onto well-floured surface and knead by hand. Knead dough until smooth and no longer sticky, adding flour with a light hand as needed, 7-10 minutes.

Split the dough into two equal pieces. Set each in a large oiled bowl, cover both bowls with plastic wrap or a damp towel, and let rise at room temperature until doubled in size. If using white flour, this should take about 2-2.5 hours. If using white whole wheat, it will take closer to 3.5 or 4. Feel free to let the dough rise in the refrigerator overnight instead; if you do this, be sure to set out the dough in plenty of time before shaping, so it can come to room temperature. Preheat oven to 375. After the rise, the dough should be soft and pliable.

Separate each mound of dough into three equal balls, for a total of six. Roll each ball into a log almost 1-foot long. Braid the logs together to create your loaf. For the nicest-looking braid, do not pinch the top edges of your logs together before braiding; simply place one log over the next and braid until you reach the bottom, then pinch those edges together. Then, flip the unfinished loaf the long way, so that the unfinished edge is now at the bottom and the loaf has been flipped over and upside down. Finish braiding and pinch these edges together. This way, both ends look identical. Tuck the very tips beneath the loaf when braiding is finished. Repeat with second loaf.

Put each loaf on its own silpat-lined baking sheet. If using eggwash, mix yolk with a 1 tablespoon water and 1 tablespoon honey. Brush over loaves. Bake at 375 degrees for 20-22 minutes, until challot are golden and baked through.


Thursday, January 9, 2014

What To Cook When You're Not In the Mood To Cook

There are some nights that I'm just not into the whole cooking thing.  I have to admit, this is happening more and more often now that Ted and I are just Ted and I.  The truth is, sometimes it just doesn't feel like it's worth it to cook a whole thing.

Ted likes his meat plus two.  I, on the other hand, could eat Goldfish crackers for dinner and be just fine with that.  Ted says he doesn't care, but I know he looks forward to dinner every night, so what's a girl to do?

A girl, specifically this girl, cooks.  That's what she does.


Here's the thing.  I feel like if I start giving into the not being in the mood to cook thing, I may never cook again.  Okay, maybe I'd occasionally cook, and for sure I'd cook when the kids came home, but the rest of the time?  Maybe not so much.

So as you can see, my challenge is to come up with something really easy, with very limited prep, to make for dinner on those nights I'm not into cooking.

Enter scallops provencal.  Truly, scallops provencal are so easy that they barely qualify as cooking.  And they'll look like you've gone to a whole lot of effort.  In my case, everyone is happy.  Ted gets his nice end of the day dinner event, and I get no more than 15 minutes in the kitchen and lots of kudos for a delicious dinner.

Throw a nice little salad together, and maybe a little couscous or some such something, and you'll look like you slaved for hours.

That's how to cook when you're not in the mood to cook.

Try this nice Spinach Salad with Dried Cranberries alongside the scallops,

Recipe:  Scallops Provencal
(2004, Barefoot in Paris)

Ingredients:

1 pound fresh bay or sea scallops
Kosher salt and freshly ground black pepper
All-purpose flour, for dredging
4 tablespoons (1/2 stick) unsalted butter, divided
1/2 cup chopped shallots (2 large)
1 garlic clove, minced
1/4 cup chopped fresh flat-leaf parsley leaves
1/3 cup dry white wine
1 lemon, cut in 1/2

Directions:

If you're using bay scallops, keep them whole. If you're using sea scallops, cut each 1 in half horizontally. Sprinkle with salt and pepper, toss with flour, and shake off the excess.

In a very large saute pan, heat 2 tablespoons of the butter over high heat until sizzling and add the scallops in 1 layer. Lower the heat to medium and allow the scallops to brown lightly on 1 side without moving them, then turn and brown lightly on the other side. This should take 3 to 4 minutes, total. Melt the rest of the butter in the pan with the scallops, then add the shallots, garlic, and parsley and saute for 2 more minutes, tossing the seasonings with the scallops. Add the wine, cook for 1 minute, and taste for seasoning. Serve hot with a squeeze of lemon juice.


Wednesday, January 8, 2014

Riff On A Classic


Lest you think I've gone completely off the deep end with far flung ingredients like cauliflower, I thought I'd post this riff on the classic coffee cake.  I love coffee cake in any form, and one that claims to have a great crumb, and is both rich and moist, demands at least a try.

Let me just put it out there that this is still a coffee cake, so if you're looking for a mock coffee cake, (i.e. one that has no carbs or calories), you might want to skip this post and tune in again tomorrow.  But if you're into cake that calls for yogurt instead of the classic sour cream, read on.

I have to admit, I was dubious.  I grew up on sour cream coffee cake with the classic streusel topping.  I really had no need to improve on what clearly is coffee cake perfection.  But I'm an adventurous sort, and this recipe did pique my interest.  (I like to throw in SAT words like pique occasionally because they amuse my friend Deborah, who loves vocabulary, syntax, and punctuation  almost as much as I do.)

But back to the cake.  The cake is made with plain greek yogurt instead of sour cream.  I only had non-fat greek yogurt in the house so I used that.  The resulting cake is moist and dense without being heavy, and has a crumb to die for.  And I'm a sucker for a good crumb.


As much as I hate to admit it, this cake could be as good as the classic court cream coffee cake.  Nonetheless, I think the next time I make this I'll double the streusel, because I love streusel almost as much as I love a good crumb.

Recipe:  Yogurt Coffee Cake
(Two Peas and Their Pod)

Note:  If you're so inclined, double the streusel.

Ingredients:
12 tablespoons unsalted butter, at room temperature
1 1/2 cups granulated sugar
3 large eggs
1 1/2 teaspoons pure vanilla extract
1 1/4 cups plain Greek yogurt (I use 0% plain Chobani)
2 1/2 cups cake flour
2 teaspoons baking powder
1/2 teaspoon baking soda
1/2 teaspoon salt

For the streusel:
1/3 cup light brown sugar, packed
2/3 cup all-purpose flour
1 1/2 teaspoons ground cinnamon
1/4 teaspoon salt
4 tablespoons cold unsalted butter, cut into pieces

For the cream cheese glaze:
3 ounces softened cream cheese
2 tablespoons butter, at room temperature
2/3 cup powdered sugar
1/4 teaspoon vanilla
3 tablespoons milk, or enough to make it a glazing consistency

Directions:

Preheat the oven to 350 degrees F. Grease and flour a 10-inch tube pan. Set aside.

Cream the butter and sugar in the bowl of an electric mixer fitted with the paddle attachment for 4 to 5 minutes, until light and fluffy. Add the eggs 1 at a time, then add the vanilla and Greek yogurt. In a separate bowl, sift together the flour, baking powder, baking soda, and salt. With the mixer on low, add the flour mixture to the batter until just combined. Finish stirring with a spatula to be sure the batter is completely mixed.

For the streusel, place the brown sugar, flour, cinnamon, salt, and butter in a bowl and pinch together with your fingers until it forms a crumble.

Spoon half the batter into the pan and spread it out with a knife. Sprinkle with half of the streusel. Spoon the rest of the batter in the pan, spread it out, and scatter the remaining streusel on top. Bake for 50 to 60 minutes, until a cake tester comes out clean.

Let cool on a wire rack. Carefully transfer the cake, streusel side up, onto a serving plate. To make the cream cheese glaze, beat cream cheese and butter together until smooth. Slowly beat in the powdered sugar. Add the vanilla extract and milk. Beat until smooth and until you have a glaze consistency. Drizzle cream cheese glaze over cooled cake and serve.


Tuesday, January 7, 2014

Feel the Braise


As many of my loyal readers (and maybe even some of my not so loyal readers) know,  I am a big fan of braising.  Especially in the winter.  And given that this winter is shaping up to be pretty awful, I'm feeling the braise more often than usual.  Honestly, grilled fish just isn't going to do it for me when it's -5 outside.  Even if it's a hearty fish.

Yesterday as I suited up to go to the grocery store, it occurred to me that I should at least attempt to make a list.  In making said list, I had to give a little thought to what we would have for dinner.  Enter the braise.  Yes, something braised would be perfect.

Over the holidays I picked up The New Slow Cooker cookbook and I hadn't made anything out of it yet.  Why not make tonight the night?

Figuring out what to make was harder than I thought it would be.  There were so many appealing options to choose from.  After narrowing it down, I settled on this Beef with Endive and Sun-Dried Tomatoes recipe because (1) it sounded really good; and (2) I knew I would be able to get everything I needed at my local grocery store.
Make sure to brown the meat well.  It'll leave lots of nice little brown bits in the pan...
which will  make for a pick braising liquid.
At this point, I was svitzing (sweating) because I had on a coat, scarf, etc. and I was in the house.  Note to self: Next time make the list before putting on the winter gear.

Now I'm going to tell you how easy this recipe was to make (which it was).  And next I'm going to tell you that it was delicious (which it was).  Ted loved it.  In fact, he raved.  In my house this is a big deal.  This is because to say Ted is a little spoiled by what's put on the table in front of him every night would be an understatement of epic proportions.   And, in any case, he does not rave all that often.

I served this with simple boiled white potatoes with a little butter, salt, and parsley.

The perfect dinner for a cold winter night.

Recipe:  Beef with Endive and Sun-Dried Tomatoes

Adapted from The New Slow Cooker, by Brigit Binns (Weldon Owen, 2013).

Ingredients:

3 lbs beef bottom round, trimmed of most fat and cut into large chunks
Salt and freshly ground pepper to taste
5 Tbs olive oil
6 garlic cloves, smashed
1 1/3 cups beef stock
1/4 cup white wine
3 fresh thyme sprigs
3 bay leaves
2 tsp Dijon mustard
2 Tbs sherry vinegar
2 Tbs walnut oil
2 large heads Belgian endive, cored and sliced
1/2 cup green olives, pitted and chopped
1/2 cup oil-packed sun-dried tomatoes, sliced
Grated zest of 1 lemon
2 Tbs chopped fresh flat-leaf parsley

Directions:

Season the beef generously all over with salt and pepper. In a large fry pan over medium-high heat, warm 2 Tbs of the olive oil. When the oil is hot, working in batches if necessary to avoid crowding, add the beef and sear until browned on all sides, about 8 minutes total. Using a slotted spoon transfer the beef to the slow cooker.

Pour off most of the fat from the pan and return to medium-high heat. Add the garlic and cook for 1 minute.

Pour in the beef stock and wine and stir to dislodge any browned bits on the bottom of the pan. Add the thyme springs and bay leaves and transfer the contents of the pan to the slow cooker. Cover and cook on low according to the manufacturer’s instruction for 5 to 6 hours. The beef should be tender and moist.

Just before the beef is ready, in a bowl, whisk together the mustard, vinegar, walnut oil, the remaining 3 Tbs olive oil, the 1.4 tsp salt and a pinch of freshly ground pepper. Add the endive, olives, tomatoes, lemon zest and parsley and toss to mix thoroughly.

Shred the beef using two forks. Transfer to individual plates or a serving platter. Moisten the beef with a little bit of braising liquid, if desired. Top the shredded beef with the endive salad mixture. Serve immediately. Serves 4 to 6.


Monday, January 6, 2014

That Pioneer Spirit


I have to admit that I've never jumped on the whole Pioneer Woman wagon train.  Sure, I have to hand it to the Pioneer Woman.  She's parlayed life on a cattle ranch into a multimillion enterprise.  But honestly, about the only way I would find life on a cattle ranch manageable is if I also parlayed it into a multimillion dollar enterprise.   That, and occasionally getting to head out to the big city on a book tour.  And even then, I'm not sure Oklahoma and I would get along.

Not only is P.W. a well known blogger, Food Network personality, cookbook writer, and photographer, she also home schools her kids.  Nothing like making the rest of us feel lazy.  As I said, I have to hand it to her.

The other day I happened upon the P.W. (aka Ree Drummond, but it's so much more fun to refer to her as P.W.), on the Food Network.  She was busy whipping up Penne a la Betsey for Ladd (her rancher hubby) and her passel of kids.  (Honestly, I have no idea of how many she has, but it seems like there are a lot of them judging from the massive amounts of food she's always whipping up in the lodge.)

But I digress.  This penne looked good.  The sauce looked rich, albeit there was a cup of cream contributing to it being rich and thick, and it had little pieces of shrimp disbursed throughout.  Hum, an interesting place to start.

Clearly, I didn't need a cup of cream in my sauce so I reduced it drastically and it was plenty.  I'm also not a fan of little cut up nuggets of shrimp, so I left them whole.  I didn't have any plain tomato sauce around, so I substituted in the same amount of marinara.  And I used olive oil instead of the olive oil and butter combo called for in the recipe.  As I said... A good place to start and, all in all, I think very positive improvements.


This is a pretty hearty dish -- perfect for life on the ranch.  For those of us city folk, this somewhat lighter version is also quite tasty as well.  Either way, we can thank the Pioneer Woman for dinner tonight.

Recipe:  Pioneer Woman "Penne a la Betsey"
(Adapted from The Pioneer Woman)

Ingredients:

¾ pounds penne pasta
1 pound shrimp
4 Tablespoons olive oil
1 cup chopped onion
2 cloves garlic, minced
½ cups white wine
1 cup marinara sauce
1/4 cup heavy cream
1 tablespoon fresh parsley, chopped
1 tablespoon fresh basil, chopped
Kosher salt and pepper to taste

Directions:

Cook the penne pasta until tender-firm and set aside.

Peel, devein and rinse (under cool water) 1 pound of extra large shrimp. Heat 2 tablespoons of olive oil in a skillet. Add the shrimp and cook for a couple minutes until just opaque. Do not overcook them. Remove from heat and let cool for a few minutes. Now, put the cooked shrimp on the cutting board and pull off the tails.

In a large skillet heat 2 tablespoons olive oil. Add the garlic and onion and sauté, stirring occasionally. After the garlic and onions have cooked a bit add your white wine. Let the wine evaporate for a few minutes, stirring occasionally.

Add the marinara and stir well to combine.  Add the heavy cream and continue stirring. Turn heat down to low and let simmer for 10 minutes so that flavors develop.

Return the shrimp to the sauce along with the chopped herbs.  Season to taste with salt and pepper.  Add the cooked penne and stir well to combine.  Serve hot.

Sunday, January 5, 2014

Year End Gluttony


The holidays are good for no one I've ever met, and I'm certainly no exception.  What's the deal with all the candy and cookies  I don't even like cookies that much, yet during the holidays there's hardly a cookie that doesn't look appealing.  Even the broken ones that I would usually chuck into the trash because they're defective.

The end of the year represents two things for me: too much eating and too much time spent in stores.  Buying things.  And not just for other people.  Unfortunately,  I"m sort of a one for you, one for me holiday shopper. I don't think I'm all that unique.  In fact, I'm pretty sure that there are a lot of you out there in cyber-land who fit this description.  I'm just admitting it.  On the internet.

But here we are.  The dawn of a new year.  A chance to start anew.  An opportunity to throw all the broken cookies into the trash and not retrieve them.  A chance to use all the stuff I brought for myself when buying for others.  Yup.  It's my annual opportunity to be a better person.

I'm starting small.  This recipe looks a lot more fattening and decadent than it is because there's a secret ingredient.  Instead of a really heavy béchamel based cheese sauce, this mac and cheese is light on the cheese and heavy on the... cauliflower.

Yup.  Cauliflower.  Pretty revolutionary, if cauliflower can be considered revolutionary.

But more than all that, this mac and cheese is really quite tasty.  At least we all thought it was good.  And it was light, which is really welcome after all the gluttony of the holidays.  All in all, a win.

Don't you just feel the good health and virtue oozing off the page?

I thought so.

Recipe:  Baked Penne with Cauliflower and Cheese
(Adapted from Fine Cooking: Cook Fresh, Winter, 2014)

Ingredients:

4 cups 1-1/2-inch cauliflower florets (about 1 lb.; from 1/2 head)
1 medium onion, sliced
2 cloves garlic, peeled
Fine sea salt or table salt
12 oz. whole wheat dried penne
2 cups 1% milk
1 tsp. dry mustard
Freshly ground black pepper
2 tsp. chopped fresh thyme
2 oz. coarsely grated sharp white Cheddar (about 1/2 cup)
1-1/2 oz. finely grated Parmigiano-Reggiano (1-1/2 cups using a rasp grater)

Directions:

Position a rack in the center of the oven and heat the oven to 375°F.

Put the cauliflower, onion, and garlic in a steamer basket set over 1 inch of boiling water in a 6- to 8-quart pot. Cover and steam until the cauliflower is tender, 10 to 15 minutes. Transfer the cauliflower, onion, and garlic to a blender.

Fill the pot three-quarters full of salted water and bring to a boil over high heat. Add the pasta and cook for 3 minutes less than the package timing. Drain and return the pasta to the pot.

While the pasta cooks, add 1 cup of the milk, the dry mustard, 1 tsp. salt, and 1/2 tsp. pepper to the vegetables in the blender and purée until smooth. Transfer to a 3-quart saucepan and stir in the remaining 1 cup of milk and the thyme. Heat over medium-low heat until hot but not boiling, about 3 minutes.

In a small bowl, mix the Cheddar and Parmigiano. Add all but 1/2 cup of the cheese to the sauce and stir until the cheese is melted. Add the sauce to the pasta and stir to combine. Transfer the pasta and sauce to an 8-inch square baking dish and sprinkle with the remaining cheese. Bake until heated through and the cheese is beginning to brown, 20 to 30 minutes.


Thursday, January 2, 2014

Citrus Blast


This is another one of those too simple to believe recipes.  In addition to being easy, easy, easy, it also really takes advantage of one of the best things about winter: citrus.  That's right.  Citrus.

We all know that the summer fruits are the sexy fruits.  The juicy peaches, nectarines, and plums.  The divine berries.  Those are the money shot fruits.  They beacon you with their deep colors and juicy come hither looks.

But citrus... Well, citrus fruits are the workhorses.  They make the juice and keep colds at bay.  They're not sexy, but they certainly are cheerful.   The combination of citrus and avocado in this salad  provide a much needed little ray of sunshine on a cold winter day.

This salad capitalizes not only only on citrus, but also features a nice dose of one of those good for you grains: millet.  I really didn't know much about millet before making this salad.  In fact, the only other time I've ever cooked with millet was back when I made millet muffins How Do You Feel About Millet?).  This salad was the first thing I've ever made where you could actually taste the millet,

If you're not as excited by millet as I've turned out to be, not to worry.  This salad would be equally as delicious as any of the other good for you grains.  Either way, you'll get a double dose of winter sunshine.

Go for it.

Recipe:  Millet Salad with Avocado and Citrus
(Fine Cooking Magasine, 2013)

Ingredients:

1-3/4 cups millet
Kosher salt
1/2 cup plus 1 Tbs. extra-virgin olive oil, more as needed
3 Tbs. grapefruit juice
3 Tbs. white wine vinegar
2 tsp. honey
Freshly ground black pepper
3/4 cup diced avocado (1/2-inch dice)
3/4 cup oranges segments, cut into pieces if large
3/4 cup grapefruit segments, cut into pieces if large
3/4 cup diced red onion (1/4-inch dice)
1/4 cup chopped fresh mint

Directions:

Rinse the millet under cold water and drain. Bring 7 cups of water to a boil in a 4-quart pot over high heat. Add 3/4 tsp. salt. Add the millet, reduce the heat to a simmer, and cook uncovered, stirring occasionally and adding more boiling water as necessary to keep the millet covered, until tender, about 15 to 20 minutes. Drain and rinse the millet with cold water to stop the cooking.

Transfer the millet to a foil-lined rimmed baking sheet, drizzle with 1 Tbs. of the oil, and toss lightly to coat. Spread the millet on the baking sheet and cool completely at room temperature or in the refrigerator.

Put the vinegar and grapefruit juice in a small bowl and gradually whisk in the remaining 1/2 cup of oil. Whisk in the honey. Taste and season with salt, pepper, and additional vinegar, juice, or oil as needed.

Put the cooked and cooled millet in a large serving bowl and toss to break up any clumps. Add the avocado, orange segments, grapefruit segment, red onion, mint, and 1/2 cup vinaigrette and toss. Taste and season as needed with more vinaigrette, salt, pepper, and serve.

Wednesday, January 1, 2014

Tough Questions With Easy Answers


I recently heard an interesting question, one that really made me think as we embark on 2014.

If this was your last year, how would you want to live it?

Okay, I'll admit it.  This question might be just a little heavy for New Year's Day, after what I am sure was a night of too much of at least one thing.  In fact, usually this question would be a little heavy for me at any time of the year.  But last year was, shall we say, defining for me.

Quite honestly, I'm happy to close the book on 2013, even though some really great things happened. Ted and I had our 25th anniversary.  Charlie and Kate both graduated.  All good... no, I mean great, things.  But 2013 was also the year I had (said in a whisper because that's how you have to say it) cancer.  Yup, for all the good things, there was that.  And that was not a great thing.

I wish I was one of those people who came through a situation like this and felt as though it had made me a better person.  Or that I was one of those people who felt that and it brought them closer to their spouse.  Or their kids.  Or their friends.  Maybe I'm just a really lucky person (I probably am), but Ted and the kids, and my friends did exactly what I would have expected.  They circled the wagons and were there for me -- just as they always have been.  There was no drama, just quiet support, a good sense of humor, and a lot of really tasteless jokes.  Just as there always are.  And just the way I like it.

So you'll have to excuse me if I'm a little anxious to move onto a year that doesn't include a lot of visits to the doctor and a close relationship with my radiologist who, by the way, is a lovely person.  If I never see another pink ribbon close up, I'm cool with that.

Having said all that, I am still pondering that question.  If this was my last year, how would I want to live it?

There's no easy answer.  Sure, I'd want to spend it with Ted and my kids.  But Charlie and Kate are away now and so I don't think that's happening.  And I'd want to spend it with my friends, most of whom are across the country in one direction or another.  Hum...  How would I want to spend it?

I think I'd like to spend the year as I always have.  Promising to be a better wife, mother, and friend (although honestly, no one is complaining so I much be doing okay).  Promising to exercise more.  Promising to try and find the deliciousness in whole grains.  Promising to bake bread and make homemade pasta because you know it just has to taste better.  Promising to spend less money and to be more organized.  Promising to make a giant index of all my cookbooks so that my family can easily figure out what I already have before they buy me a new one.  Promising to stop and smell the roses.

Maybe my answer to this question is simple.  If this was my last year, I don't think I'd change a thing.  Oh, you can be sure that  I'd keep making all those promises because you just never know.  2014 could finally be the year that I finally get around to cleaning out the closets and making a cookbook index.