search you little tarte
Thursday, May 31, 2012
A Health(ier) Choice
The other day as I was looking for cake flour, I came across a bag of spelt flour. What the hell was I doing with spelt flour? All I can figure out is that I must have bought it by mistake because I cannot imagine the scenario under which I would actually choose to buy spelt flour. But I have officially decided that this is the summer of using up so I had to come up with something to do with that bag of spelt flour.
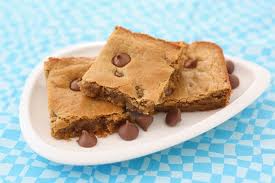
After an exhaustive (well, it wasn't all that exhaustive), Google search for cookies made with spelt flour, I settled on a recipe for peanut butter chocolate chip brownies. Before you get all excited about these brownies, let me just tell you that I made them and they were vile. They were dry and hard and all the things that brownies shouldn't be.
But I am not one to give up and I still had half a bag of spelt flour, so I got to work. It became my personal mission to make brownies using spelt flour that would taste good. No small order, let me tell you.
The recipe below is my take on healthier brownies, although given the two sticks of butter and all the sugar, I'm not sure they really qualify as a health food. I did use some coconut sugar in place of granulated sugar so I suppose that adds to the healthfulness. Who knows? What I can tell you is that these are much tastier than the original recipe and not nearly so hard and dry.
Kate took them to school for the Ultimate Teenage Taste Test and they got high marks. I'm not sure that was because they were so drop dead delicious or because there were teenagers tasting them and teenagers are always hungry and will pretty much eat anything.
Either way, I'll take the high marks. For those of you who are into things like spelt flour, I think you'll be really impressed. You could go crazy and use date sugar in place of the brown sugar. I didn't go that far, mostly because they didn't have date sugar at Whole Foods and there was no way I was going to schlep around looking for it.
Let me know what you think.
Recipe: Peanut Butter Chocolate Chip Brownies
Ingredients:
1 cup unsalted butter, softened
1 cup creamy peanut butter
1-½ cup coconut sugar
1 cup dark brown sugar
1 Tablespoon molasses
4 whole large eggs
1 Tablespoon pure vanilla
3 cups spelt flour
1-½ teaspoon baking powder
½ teaspoons cinnamon
½ teaspoons kosher salt
1-½ cup semi sweet chocolate chips
Directions:
Preheat oven to 350ºF and grease a 9x13 baking dish.
In the bowl of an electric mixer, cream butter and peanut butter together until fluffy. Add coconut sugar and brown sugar and mix until combined. Add the molasses, eggs and vanilla. Mix until incorporated on low speed. Keeping the mixer on low speed, add the flour, baking power, cinnamon, salt and chocolate chips slowly. Mix until everything is combined. Pour the batter into the prepared baking dish. Smooth the top.
Bake in the center of the oven for 26-28 minutes or until the edges are golden brown and a toothpick inserted comes out clean. Let cool and then cut into squares.
Wednesday, May 30, 2012
Simply Perfect
I am not going to be presenting you with complicated chocolate layer cakes. As much as I love those, I always think that they're more appropriate for the cooler weather. This is somewhat perplexing because I usually think layer cake, and chocolate layer cake in particular, is perfect any time of the year.
Instead, I'm going to give some simple cakes a try. This recipe for Raspberry Buttermilk Cake is a perfect example of what I'm talking about. First of all, it pretty much calls for a bunch of ingredients you probably already have in the house. Second, what could be better than a cake with raspberries? And third, it takes about 22 seconds to throw together and get into the oven.
And isn't summer all about making life easy?
This would be the perfect cake to bring to a picnic, if you're in to that kind of thing. Or to a potluck (although I don't think I've ever been to an actual party that was billed as a potluck). Or if you're hosting a little soiree at your place. Do you get my drift? This is just a great little summer dessert.
| A beautiful batter. |
| Ready for the oven |
| Just out of the oven. |
Recipe: Raspberry Buttermilk Cake
(Gourmet Magazine, June, 2009; Smitten Kitchen)
Ingredients:
1 cup (130 grams) all-purpose flour
1/2 teaspoon (2 grams) baking powder1/2 teaspoon (2 grams) baking soda
1/4 teaspoon salt
1/2 stick (56 grams) unsalted butter, softened
2/3 cup (146 grams) plus 1 1/2 tablespoons (22 grams) sugar, divided
1/2 teaspoon pure vanilla extract
1/2 teaspoon finely grated lemon zest (optional)
1 large (57 grams) egg
1/2 cup (118 ml) well-shaken buttermilk
1 cup (5 ounces or 140 grams) fresh raspberries
Directions:
Preheat oven to 400°F with rack in middle. Butter and flour a 9-inch round cake pan.
Whisk together flour, baking powder, baking soda, and salt and set aside. In a larger bowl, beat butter and 2/3 cup (146 grams) sugar with an electric mixer at medium-high speed until pale and fluffy, then beat in vanilla and zest, if using. Add egg and beat well.
At low speed, mix in flour mixture in three batches, alternating with buttermilk, beginning and ending with flour, and mixing until just combined.Spoon batter into cake pan, smoothing top. Scatter raspberries evenly over top and sprinkle with remaining 1 1/2 tablespoons (22 grams) sugar.
Bake until cake is golden and a wooden pick inserted into center comes out clean, 20 to 25 minutes. Cool in pan 10 minutes, then turn out onto a rack and cool to warm, 10 to 15 minutes more. Invert onto a plate.
Tuesday, May 29, 2012
A New Take on Tabbouleh
Despite the fact that Kate thinks we eat chicken every night for dinner, which is not true, I love chicken. Chicken can be prepared in a million different ways and it always delivers. Rarely have I met a chicken dish I didn't like. For me, chicken is the protein for all seasons.
I am also a lover of summer salads. To me, there is nothing more refreshing on a hot night than a salad filled with all the best that the season has to offer. Tabbouleh salad is a particular favorite of mine.
I started out with Ina Garten's Chicken with Tabbouleh salad and then went to town with it, adding sharp feta cheese and salty Kalamata olives. What results is the perfect summer salad, as far as I'm concerned. And there were lots of leftovers, which will make delicious lunches for a couple of days.
Recipe: Chicken with Tabbouleh
(Adapted from Barefoot Contessa Parties!, 2001)
Ingredients:
1 1/2 cups boiling water
1 cup bulgur wheat
1/4 cup freshly squeezed lemon juice (2 lemons)
Olive oil
Kosher salt
1 whole (2 split) chicken breast, bone in, skin on
Freshly ground black pepper
1 cup minced scallions, white and green parts (1 bunch)
1 cup chopped fresh mint leaves (2 bunches)
1 cup chopped fresh flat-leaf parsley (1 bunch)
1 cup pitted Kalamata olives
8 ounces feta cheese, medium-diced
1 hothouse cucumber, unpeeled, halved lengthwise, seeded, and medium-diced
2 cups halved cherry tomatoes
Directions:
Preheat the oven to 350 degrees F.
In a heat-proof bowl, pour the boiling water over the bulgur wheat. Add the lemon juice, 1/4 cup olive oil, and 1 1/2 teaspoons of salt. Stir. Cover the bowl with plastic wrap and allow the bulgur to stand at room temperature for about 1 hour.
Place the chicken breast on a baking sheet and rub it with olive oil. Sprinkle liberally with salt and pepper. Roast for 35 to 40 minutes, until just cooked. Set aside until cool enough to handle.
Remove the chicken meat from the bones and discard the skin. Cut the chicken into medium dice and add to the tabbouleh. Add the scallions, mint, parsley, cucumber, olives, feta, tomatoes, 2 teaspoons salt, and 1 teaspoon pepper. Season, to taste, and serve immediately or cover and refrigerate. The flavors will improve as it sits.
Monday, May 28, 2012
Backyard Bounty
Ted is a frustrated gardener. We live in the city where farmland is at a premium. Or rather, I should say that farmland is nonexistent. But that doesn't stop Ted. Every summer he valiantly tends to his tomatoes and whatever else he can manage to squeeze into our urban sized backyard.
The one crop we always have an abundance of is mint. This is probably because mint is one of those things that doesn't need an invitation to grow and take over every millimeter of available space. I have to say that Ted does a pretty good job of reigning the mint into a small square of space, but it's not easy.
The net result of all this is that I have to make an effort to cook with mint. If I didn't, we would be completely overrun with the stuff. Yes, we could just remove it and be done with the mint. But that would be no fun. So, I am constantly on the lookout for recipes that call for mint.
This recipe from Giada DeLaurentiis not only calls for mint, it call for a lot of mint, which makes it even better -- both in taste and in usefulness. It also calls for a lot of basil, which Ted also grows and that we have in abundance. The recipe is quick to prepare, pretty low in fat (which at this time of the year everyone is thinking about) and has a pleasant kick to it courtesy of the chili peppers.
You can go all out and make a trip to an Asian market to pick up your ingredients for this recipe. Conversely, you can do what I did, which was just to wing it with what I had in the house. Either way is delicious.
Recipe: Spicy Mint Beef
(Giada De Laurentiis)
* Note: I took the lazy approach and used serrano chilies, regular basil (because that's what grows in our backyard), and in place of the sweet and black soy sauces, I used 1/4 cup regular soy sauce mixed with 1/4 cup honey.
Make sure to assemble all of your ingredients before you start cooking. This recipes goes very fast and you'll want to be ready to roll.
Ingredients:
3 tablespoons vegetable or canola oil
4 cloves garlic, minced
3 Thai chiles, such as prik kee noo, or 3 serrano chiles, stemmed and thinly sliced
1 pound flank steak, very thinly sliced
3 shallots, thinly sliced
1 red bell pepper, stemmed, cored, seeded and cut into 1/8-inch thick slices
1/4 cup fish sauce
2 tablespoons sweet soy sauce
2 tablespoons black soy sauce
1 tablespoon Sriracha sauce
1 1/2 cups chopped fresh Thai basil leaves
1 cup whole fresh mint leaves
Directions:
In a large skillet, heat the oil over medium-high heat. Add the garlic and chiles and cook until aromatic, about 30 seconds. Add the steak and cook, stirring frequently, for 2 minutes. Add the shallots and bell pepper and cook for 1 minute. Add the fish sauce, sweet soy sauce, black soy sauce and chili paste. Bring the mixture to a low simmer and cook, stirring frequently until the meat is cooked through and the vegetables are tender, about 3 minutes. Remove the skillet from the heat and serve.
Serving suggestion: sticky or steamed white rice
The one crop we always have an abundance of is mint. This is probably because mint is one of those things that doesn't need an invitation to grow and take over every millimeter of available space. I have to say that Ted does a pretty good job of reigning the mint into a small square of space, but it's not easy.
The net result of all this is that I have to make an effort to cook with mint. If I didn't, we would be completely overrun with the stuff. Yes, we could just remove it and be done with the mint. But that would be no fun. So, I am constantly on the lookout for recipes that call for mint.
This recipe from Giada DeLaurentiis not only calls for mint, it call for a lot of mint, which makes it even better -- both in taste and in usefulness. It also calls for a lot of basil, which Ted also grows and that we have in abundance. The recipe is quick to prepare, pretty low in fat (which at this time of the year everyone is thinking about) and has a pleasant kick to it courtesy of the chili peppers.
You can go all out and make a trip to an Asian market to pick up your ingredients for this recipe. Conversely, you can do what I did, which was just to wing it with what I had in the house. Either way is delicious.
Recipe: Spicy Mint Beef
(Giada De Laurentiis)
* Note: I took the lazy approach and used serrano chilies, regular basil (because that's what grows in our backyard), and in place of the sweet and black soy sauces, I used 1/4 cup regular soy sauce mixed with 1/4 cup honey.
Make sure to assemble all of your ingredients before you start cooking. This recipes goes very fast and you'll want to be ready to roll.
Ingredients:
3 tablespoons vegetable or canola oil
4 cloves garlic, minced
3 Thai chiles, such as prik kee noo, or 3 serrano chiles, stemmed and thinly sliced
1 pound flank steak, very thinly sliced
3 shallots, thinly sliced
1 red bell pepper, stemmed, cored, seeded and cut into 1/8-inch thick slices
1/4 cup fish sauce
2 tablespoons sweet soy sauce
2 tablespoons black soy sauce
1 tablespoon Sriracha sauce
1 1/2 cups chopped fresh Thai basil leaves
1 cup whole fresh mint leaves
Directions:
In a large skillet, heat the oil over medium-high heat. Add the garlic and chiles and cook until aromatic, about 30 seconds. Add the steak and cook, stirring frequently, for 2 minutes. Add the shallots and bell pepper and cook for 1 minute. Add the fish sauce, sweet soy sauce, black soy sauce and chili paste. Bring the mixture to a low simmer and cook, stirring frequently until the meat is cooked through and the vegetables are tender, about 3 minutes. Remove the skillet from the heat and serve.
Serving suggestion: sticky or steamed white rice
Wednesday, May 23, 2012
We Made It
I am the happiest person alive right now. I am happy because we have made it through Kate's junior year. For a time it looked dicey, but the AP tests are done as are all of her final exams, and now it's smooth sailing to June 6th and the end of the school year.
Kate's school is on a funky calendar. The schedule is much like a 4-4-1, where classes end in May just before the AP tests. After the AP tests they go right into finals. Then for the last two weeks of the school year (the 1 of the 4-4-1), they have mini courses, which are less academic and a lot more fun than say, physics.
But the school schedule isn't the point of all this talk. The point is that we have all made it through Kate's junior year. There were times when I really wondered if we could make it to the end, what with all the teenage girl drama, homework, and SAT's, but we have. (My friend Karen described the junior year as "one big test".)
I am so happy.
So now we are on to the summer and all that that entails. There will be (lots of) tennis and (lots of) college visits. There will also be lots of opportunities for Kate to catch up on all the sleep she missed out on since last September. And, most of all, there will be oodles of time for her to be with her friends.
Social plans. Imagine that.
So, in honor of all the fun my beloved daughter is going to have this summer, here is one of my all time favorite recipes. Make this Friendship Bread and pass it along to your friends.
Recipe: Amish Friendship Bread Starter
Ingredients:
1/4 cup warm water (110 degrees F/45 degrees C)
3 cups all-purpose flour, divided
3 cups white sugar, divided
3 cups milk
Directions:
On days 2 thru 4; stir starter with a spoon.
Day 5; stir in 1 cup flour, 1 cup sugar and 1 cup milk.
Days 6 thru 9; stir only.
Day 10; stir in 1 cup flour, 1 cup sugar and 1 cup milk. Remove 1 cup to make your first bread, give 2 cups to friends along with this recipe, and the recipe for the bread (below). Store the remaining 1 cup starter in a container in the refrigerator, or begin the 10 day process over again (beginning with step 2).
Recipe: Amish Friendship Bread
Ingredients:
2/3 cup vegetable oil
3 eggs
2 cups all-purpose flour
1 cup white sugar
1 teaspoon ground cinnamon
1/2 teaspoon salt
1/2 teaspoon baking soda
1 1/4 teaspoons baking powder
1 teaspoon vanilla extract
Directions:
In a large bowl, combine the Amish bread starter with oil, eggs, 2 cups flour, 1 cup sugar, 1 teaspoon ground cinnamon, 1/2 teaspoon salt, 1/2 teaspoon baking soda, 1 1/4 teaspoons baking powder, and 1 teaspoon vanilla. Mix well. Pour into prepared loaf pans.
Bake in preheated oven for 50 to 60 minutes.
Tuesday, May 22, 2012
How Do You Feel About Millet?
Frankly, I wasn't sure how I felt about millet. Millet? Millet is not a sexy grain. Millet is not even a grain I've ever thought much about. But grains are the new "it" food, and I don't like to feel left out of a food trend.
There's an interesting story to these millet muffins. My friend Mona, who is as much of a foodie as I am, was telling me that her husband had the most delicious millet muffin while on a college trip with their daughter. It was from the Metropolitan Bakery in the Chestnut Hill section of Philadelphia. She said that we had to figure out how to make this muffin.
Now, I'm not one to reinvent the wheel so I checked in with by good friend Google. Low and behold, up popped the recipe for the Metropolitan Bakery Millet Muffin.
I, who was not overwhelmed by the idea of a millet muffin, am now a true believer. These don't have that twigs and nuts texture that so many whole grain muffins have. What they do have is an earthy flavor (which is different than a twiggy texture) that is so satisfying. And good for you too.
Recipe: Metropolitan Millet Muffins
(James Barrett, Co-Owner/Baker, Metropolitan Bakery, Philadelphia PA)
Note: This is a great recipe to make the night before (up to adding the flour mixture) so that you can have fresh muffins ready in a jiffy the next morning.
Makes 12 muffins
Ingredients:
1 cup millet
2 cups all purpose flour
1 1/4 teaspoon baking powder
1/2 teaspoon baking soda
3/4 teaspoon kosher salt
3 large eggs, slightly beaten
1/4 cup milk
1 tablespoon vanilla
1 1/2 sticks (3/4 cups) unsalted butter, softened
1 cup brown sugar, packed
Directions:
Preheat oven to 375 degrees F. Butter 12 1/2 cup muffin cups.
On a baking sheet toast millet in one layer in the oven until lightly golden, 3 to 4 minutes. Cool millet completely.
Into a medium bowl sift together flour, baking powder, baking soda, and salt. Stir in the millet. In another small bowl stir together the eggs, milk and vanilla. Set aside. Cream well the butter and brown sugar until light and fluffy. Alternately beat in the flour and milk mixtures, beginning and ending with the flour. Do not over beat.
Spoon batter into prepared cups and bake until golden and a toothpick inserted into the center comes out clean, 20 to 25 minutes. Cool muffins 5 minutes before turning out. Serve warm or room temperature with fruit preserves.
Monday, May 21, 2012
A Lasagna By Any Other Name
| I never claimed to be a good photographer. Enough said. |
Charlie is an interesting creature. From a young age, he would eat anything. I remember once, when Charlie was about 2, I was going out for the evening and Ted was in charge of feeding Charlie dinner. Ted grilled catfish. Other Daddies would have gone the safe route with chicken nuggets, but as I said, Charlie ate everything so there was no fear he would rebel when he was served catfish.
Oddly enough though, Charlie does not like lasagna. I always think of lasagna as a somewhat innocuous food. It's noodles. It's cheese. It's sauce. Basically lasagna is pizza in a casserole dish, with noodles in place of crust. He likes pizza just fine so why not lasagna?
The only thing I can can trace Charlie's dislike of lasagna back to is our nanny Mary Rose. She gave him so much apple juice as a toddler that he hasn't had a glass since. Maybe she made him a lot of lasagna too and I just didn't realize.
The point of all this, and there is a point, is that it's really too bad that Charlie doesn't like lasagna of any type because there are in fact a zillion kinds of lasagna, most of which are quite delicious.
This recipe for Pastel Azteca is filled with delicious zucchini, corn, poblano peppers, Oaxaca cheese, and tortillas, all layered together to create a lasagna with a Mexican flair. It's somewhat cumbersome to prepare so start early and clean up while it's in the oven. You will have used every skillet you own but it will be well worth the effort.
Unfortunately this is not a recipe I will ever make for Charlie. It's funny because he would probably be more than happy to have this for dinner if I rolled the tortillas up enchilada style.
As I said, Charlie is an interesting creature.
Recipe: Pastel Azteca
(Marcela Valladolid)
Ingredients:
12 corn tortillas
Vegetable oil for frying
2 tablespoons vegetable oil
3 chopped garlic cloves
1 chopped small onion
2 cups roma tomato, boiled 30 seconds, peeled, and pureed
3 tablespoons unsalted butter
4 1/2 cups chopped zucchini
1 1/2 cup fresh corn off the cob or 3 fresh corns
3 poblano chiles charred, seeded, deviened, and cut in strips.
Salt and pepper to taste
Non stick cooking spray
3/4 cup mexican crema
3 cups shredded Oaxaca cheese
Directions:
Preheat oven to 350 degrees.
In a large heavy saute pan, add enough oil to fry 12 tortillas. Heat oil on medium-high heat. When hot, working in batches, quickly fry tortillas. Simply fry for 10 seconds on each side. Remove tortillas from heat and drain in paper towel.
In a medium saute pan on medium heat, heat oil and add garlic and onion. Saute for about 3 minutes, or until onion is translucent. Add tomato puree. Cook for 10 minutes and turn heat off.
In a separate large saute pan on medium heat, melt butter. Add zucchini and corn. Cook for 2 minutes and add the poblano. Add 1/2 cup of water to mixture and cook for 4 more minutes. Season to taste with salt and pepper.
Spray a 9x13 baking dish with non stick cooking spray. Cover the bottom with tortillas, about 4 tortillas. Add 1/2 cup of tomato mixture on top of tortillas. Top with 1 1/2 cups of zucchini mixture. Add 1 cup of cheese. Drizzle with 1/4 cup of mexican crema. Season the first layer with salt and pepper. Start on the second layer with tortillas, then tomato, zucchini, cheese, and with mexican crema. Season to taste with salt and pepper. Do it again for a third time, to finish off with a third layer, making sure to season with salt and pepper.
Bake uncovered until cheese begins to melt, about 10 to 15 minutes.
Serves 8
Subscribe to:
Posts (Atom)


